Soundboard (Pt. 2)
After completing the rosette and cutting out the sound hole, I turn my attention to bracing the top of the guitar.
The braces serve two equally important functions:
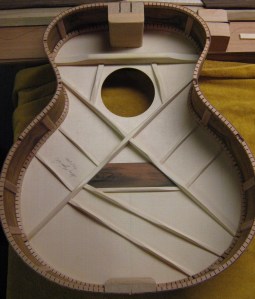
First, they provide structural support to the instrument. The tuned strings exert pretty large forces on both the neck and the soundboard of the guitar. A typical 6 string guitar tuned to standard pitch will experience close to 200 pounds of force from the strings, although this can vary with the gauge of strings used. The total force on this 12 string guitar will be even greater–probably about 250 pounds. With most steel string guitars the strings are anchored to the bridge, which is glued to the soundboard of the guitar. The roughly 200 pounds of tension from the strings acts to try to push the front of the bridge downward and pull the area of the soundboard behind the bridge upward. At the same time, the string tension creates forces that try to pull the bridge off the soundboard and try to bow the guitar’s neck. The result of these forces is often seen in older guitars, which can sometimes have seriously distorted soundboards and necks. Sometimes the soundboards become so distorted that the bridge lifts off. Regluing the bridge on an extremely distorted soundboard can be a big challenge. Below is a picture of the bracing pattern I use on most of my steel string guitars. As you can see, there are braces running in different directions and varying in dimensions. This is a variation on the classic Martin X-bracing pattern. I’ve experimented and made changes to it over the years. This pattern has produced a lot of great sounding, structurally sound guitars for me.

The second function of the braces is to shape the sound of the guitar. By moving braces around, changing their angles, widths, thicknesses, or even shapes, I can alter the tone of the guitar. Knowing how subtle changes in the braces is going to effect the final tone of the guitar is something that can really only be learned through experience. The “art” of building a guitar top is to use just enough bracing to counter the string forces; any extra bracing will have an adverse effect on the tone.
Things are a little different for this particular 12 string guitar project. For this guitar, the strings will be anchored to a tailpiece that is attached to the end of the guitar’s body, rather than being anchored at the bridge. The strings will pass over the bridge, but they aren’t attached to it. As a result, the forces exerted on the soundboard of the guitar are different. Now the forces from the strings will only be trying to push the bridge directly downward. There won’t be any forces trying to pull the bridge off the soundboard, or trying to pull up on the part of the soundboard behind the bridge. What this means is that the guitar will not need all of the different kinds and numbers of braces as you saw above. This soundboard only needs to be braced to resist the string forces in one direction. The bracing pattern chosen by the craftsmen at Stella to achieve this result is know as “ladder bracing.” It consists of a few braces running parallel to each other and perpendicular to the center line of the top. This pattern is also used in most Selmer/Macafferi type gutars and was common in gut string guitars from the 18th and 19th centuries.
The drawing I used for my starting point on this project showed only three braces on the soundboard. However, my friend who has had a lot of experience with Stella guitars told me that many of the Leadbelly Stellas had four soundboard braces and that those guitars generally sound better and hold up better, so it was his recommendation that I use four braces. It seemed like a good idea to me. By having four braces I am able to make each brace a little lighter and I can also work the soundboard a little bit thinner than I would otherwise. Based on my experience with building Selmer-style gypsy jazz guitars, I think a thinner top and slightly smaller braces will improve the sound of the guitar.
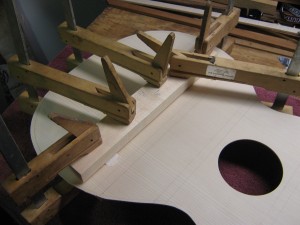
After determining the exact location of the saddle and laying out where each of the braces will go, the first piece to be glued on is a large “bridge plate” of spruce. It reinforces the soundboard right under where the bridge will be. Here is a picture of it being glued on. There is a thick, flat piece of maple sitting on top of it to help distribute the pressure of the clamps more evenly.

Next, the four ladder braces are glued on. There is another flat brace glued between the topmost soundboard brace and the spot where the headblock will be. This helps stabilize that area and reduces the chance of the soundoard cracking if the fretboard–which is glued there–should happen to expand or contract at a different rate than the soundboard. Below is a picture of the soundboard with all of the braces glued to it. The wide, flat looking braces on either side of the soundhole are not a part of the original specifications, but I think they are very necessary to strengthen the soundboard. The area around the hole is naturally weaker than the rest of the top and these braces will reduce the likelihood of that part of the top distorting.
